Official Blog for OBE Messages
 

Older Post

Home
Friday, 10 August 2012
freebsd post installation guide
we got da FreeBSD manually setup in our virtualbox, now we want to perform post installation.

a) set root password
passwd

b) set our ethernet to use DHCP
ee /etc/rc.conf

// add the below text into rc.conf
ifconfig_em0="DHCP"

c) update freebsd
freebsd-update fetch
freebsd-update install

d) find a wm, in my case, i wanna try lxde, which is available in /usr/ports/
make
make install

echo 'exec startlxde' > ~/.xinitrc

Labels: , , ,

Thursday, 9 August 2012
install freebsd manually
* much information here are based on helpful guides located on following links.
1. http://www.wonkity.com/~wblock/docs/html/disksetup.html

2. http://rickvanderzwet.nl/trac/personal/wiki/FreeBSDOnEmbeddedDevice


for me, there is only one reason to do FreeBSD installation manually, to learn more by going through the process, i doubt there is significant faster or usefulness compare to using sysinstall

i will use virtualbox with FreeBSD dvd FreeBSD-9.0-RELEASE-i386-dvd1.iso so skip downloading online files since i do offline installation.

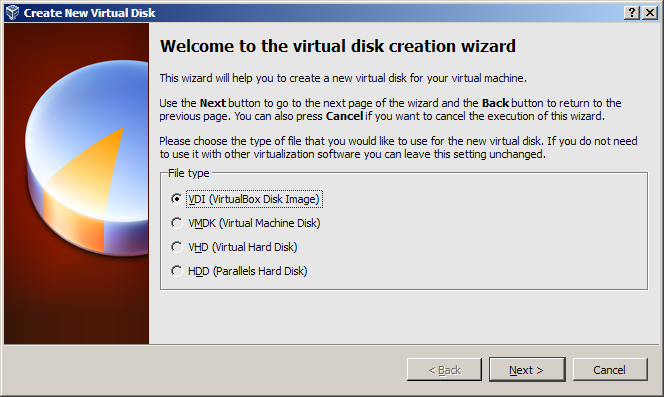
1. follow the images below, these are the process to create a freebsd guest box using virtualbox.


2. we will add the FreeBSD iso file to guest box, as shown on below picture.

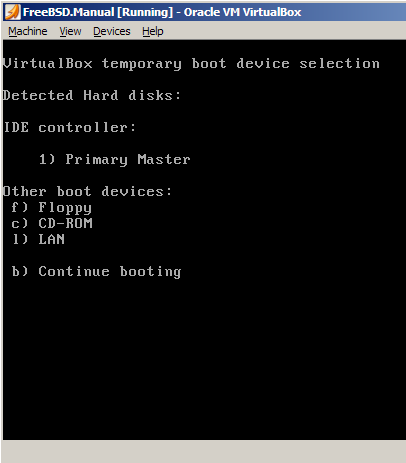
3. start our guest machine, you may need to press F12 and select to boot from cdrom by pressing c

4. select Live CD then system will boots us into shell.

5. the login ID is root

6. we will create our GPT partition table first using gpart on our blank virtualbox hard disk. ( /dev/ada0 ) /dev/ad0 for freebsd before version 9.0
# gpart create -s gpt ada0
ada0 created

7. we could show our partition using the following command
# gpart show -l ada0
=>	34	37748669	ada0	GPT	(18G)
	34	37748669		- free -	(18G)

8. next is create a boot partition and apply bootcode on that partittion, this boot partition is NOT /boot

the -i is partition index number that we want to bootcode to be wrote into.
# gpart add -t freebsd-boot -l gpboot -s 512K ada0
ada0p1 added
# gpart bootcode -b /boot/pmbr -p /boot/gptboot -i 1 ada0
bootcode written to ada0

9. next we create a / root filesystem partition ( 10G ), a swap partition ( 512M ), and the fill the rest partition for /usr.
#gpart add -t freebsd-ufs -l gprootfs -b 1M -s 10G ada0
ada0p2 added

#gpart add -t freebsd-swap -l gpswap -s 512M ada0
ada0p3 added

#gpart add -t freebsd-ufs -l gpusr ada0
ada0p4 added

10. if you do a gpart show, you should probably get something like below.

11. if you somehow want to redo everything, you must delete the added partitions then only you can destroy the partition table.
#gpart delete -i 1 ada0
ada0p1 deleted
#gpart delete -i 2 ada0
ada0p2 deleted
#gpart delete -i 3 ada0
ada0p3 deleted
#gpart delete -i 4 ada0
ada0p4 deleted
#gpart destroy ada0
ada0 destroyed

12. we then format the partitions with UFS filesystem using the below commands, we don't have to newfs swap and boot partitions
#newfs /dev/gpt/gprootfs
#newfs -U /dev/gpt/gpusr

13. we will mount those partitions on /mnt and then extract based.txz & kernel.txz to it. we need to create /usr directory inside /mnt because we want to mount /dev/gpt/gpusr to /mnt/usr
#mount /dev/gpt/gprootfs /mnt
#mkdir /mnt/usr
#mount /dev/gpt/gpusr /mnt/usr/

#xzcat /usr/freebsd-dist/base.txz | tar --unlink -xpzf - -C /mnt/
#xzcat /usr/freebsd-dist/kernel.txz | tar --unlink -xpzf - -C /mnt/

14. we then write /etc/fstab to enable our next boot automount using vi
#vi /mnt/etc/fstab

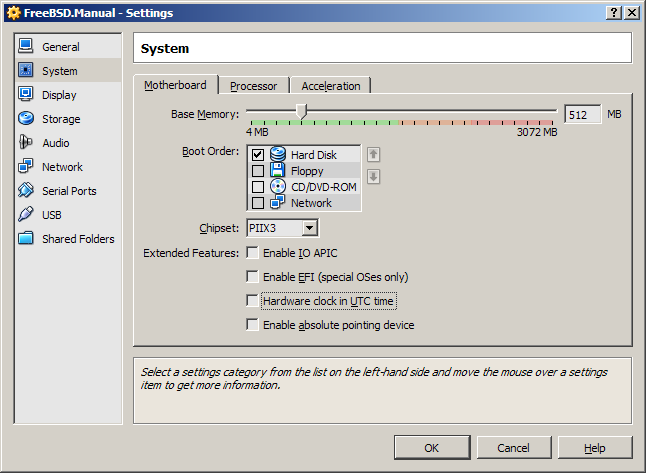
15. do a reboot and start adding packages! make sure you change the boot loader to boot hard disk first.

Labels: , , , ,

Monday, 6 August 2012
alpine linux post installation
we got alpine up, with SSH we can putty into our alpine and continue post installation from there.

1. we set up alpine repositories
localhost:~# vi /etc/apk/repositories
since vi is the only editor we got currently, so make sure you know how to escape from the vi editor, will cost your hours and probably machine reset if you don't know how to use this vi editor. wink!!

2. we use the following repositories
http://dl-3.alpinelinux.org/alpine/v2.4/main/

3. update the package
apk update

4. since i want x desktop, so i run
localhost:~# setup-xorg-base
it will starts downloading & install around 40 packages

// after packages installation finish
localhost:~# Xorg -configure

5. i want to use pekwm, i think it is kinda awesome
localhost:~# apk add pekwm
localhost:~# apk add xprop
localhost:~# apk add lxterminal
localhost:~# apk add gnome-icon-theme
localhost:~# apk add gnome-themes

// more to add, i will list out later


// create this file, if you got no nano, apk add nano
localhost:~# nano ~/.xinitrc
#!/bin/sh
xset b off
exec pekwm

6. startx will load a blank black window with movable mouse pointer.

Labels: , , , ,

alpine linux installation using fdisk
i found a linux distro that use uclibc, busybox & linux kernel, it feels awesomely small, mini and suitable probably for embedded project.

i first discovered it through this link, http://winworldpc.com/library_m2.shtml, there are lots of amazing stuffs there :)

you can read more about alpine linux here.

Alpine Linux comes with some setup-* scripts to facilitate users, what i intend to write here is how to fdisk the hard disk, partition them, then install Alpine Linux into it manually.

1. download alpine linux iso file, the one i got is alpine-2.4.5-x86.iso

2. boot your machine, log in with root (no password)

3. key in setup-alpine

4. select keyboard layout, us

5. select variants, us

6. hostname, localhost

7. initialize eth0, enter to use dhcp (default)

8. password for root

9. hostname, localhost

10. timezone, UTC, you can change to other timezone, but it seems alpine script cannot accept the bios clock is local clock time

11. http proxy, none

12. finding mirrors, f to let alpine script find the best mirrors.

13. ssh server, openssh

14. ntp client, none

15. choose your hard disk, sda
Available disks are:
  sda	(19.3 GB ATA	VBOX HARDDISK	)
  sr0	(0.2 GB VBOX	CD-ROM		)
Which disk(s) would you like to use? (or '?' for help or 'none') [none] sda

16. key in sys because we want setup-alpine to extracts some files to ease our tasks later
How would you like to use it? ('sys', 'data' or '?' for help) [?] sys

17. please key in n, otherwise your whole hard disk will get auto partition by alpine-script.
WARNING: The following disk(s) will be erased:
  sda	(19.3 GB ATA	VBOX HARDDISK	)
WARNING: Erase the above disk(s) and continue? [y/N]: n
localhost:~#

18. fdisk /dev/sda

19. i want to set my partition to cylinder boundery, so below is the copy paste from putty screen
Command (m for help): n
Command action
   e   extended
   p   primary partition (1-4)
p
Partition number (1-4): 1
First cylinder (1-2349, default 1):[enter here, no need to key in value]
Using default value 1
Last cylinder or +size or +sizeM or +sizeK (1-2349, default 2349): 120

Command (m for help): n
Command action
   e   extended
   p   primary partition (1-4)
p
Partition number (1-4): 2
First cylinder (121-2349, default 121):[enter here, no need to key in value]
Using default value 121
Last cylinder or +size or +sizeM or +sizeK (121-2349, default 2349): 600

Command (m for help): n
Command action
   e   extended
   p   primary partition (1-4)
p
Partition number (1-4): 3
First cylinder (601-2349, default 601):[enter here, no need to key in value]
Using default value 601
Last cylinder or +size or +sizeM or +sizeK (601-2349, default 2349): 1500

Command (m for help): p

Disk /dev/sda: 19.3 GB, 19327352832 bytes
255 heads, 63 sectors/track, 2349 cylinders
Units = cylinders of 16065 * 512 = 8225280 bytes

   Device Boot      Start         End      Blocks  Id System
/dev/sda1               1         120      963868+ 83 Linux
/dev/sda2             121         600     3855600  83 Linux
/dev/sda3             601        1500     7229250  83 Linux

20. then we set active boot on partition 1, change partition 2 to linux swap
Command (m for help): a
Partition number (1-4): 1

Command (m for help): t
Partition number (1-4): 2
Hex code (type L to list codes): 82
Changed system type of partition 2 to 82 (Linux swap)

Command (m for help): p

Disk /dev/sda: 19.3 GB, 19327352832 bytes
255 heads, 63 sectors/track, 2349 cylinders
Units = cylinders of 16065 * 512 = 8225280 bytes

   Device Boot      Start         End      Blocks  Id System
/dev/sda1   *           1         120      963868+ 83 Linux
/dev/sda2             121         600     3855600  82 Linux swap
/dev/sda3             601        1500     7229250  83 Linux

21. we use "w" to write our changes into partition table.
Command (m for help): w
The partition table has been altered.
Calling ioctl() to re-read partition table

22. next we will need to format our /dev/sda1 & /dev/sda3, we can use the below command to perform these tasks.
localhost:~# mkfs.ext3 /dev/sda1
localhost:~# mkfs.ext3 /dev/sda3
localhost:~# mkswap /dev/sda2

23. we create /mnt/boot directory, then we will mount our partition to /mnt
localhost:~# mkdir /mnt/boot/
localhost:~# mount -t ext3 /dev/sda3 /mnt
localhost:~# mount -t ext3 /dev/sda1 /mnt/boot

24. install on our /mnt
localhost:~# mkdir setup-disk /mnt
You might need to fix the MBR to be able to boot

25. next is install the MBR to /dev/sda, using the below command
localhost:~# dd if=/usr/share/syslinux/mbr.bin of=/dev/sda
0+1 records in
0+1 records out

26. poweroff or reboot, then we can start apk packages into our mini alpine linux.

Labels: , , , ,

Tuesday, 24 July 2012
libevent - evbuffer_add_file
this function is a little bit tricky from assembly programming point of view, unless you dig into the source or see the ollydbg output,

buffer.h
========
int evbuffer_add_file(
struct evbuffer *outbuf,
int fd,
ev_off_t offset,
ev_off_t length);

usually we assume 4 arguments = 4 DWORD but not in this case.

util.h
======
#ifdef WIN32
#define ev_off_t ev_int64_t
#else

#define ev_int64_t signed __int64

see that, these ev_off_t is 64 bits (QUADWORD), damn it,

so, the proper way to call this function would be
mov eax,[efilelen]
cdq
push edx eax
push 0 0
cinvoke evbuffer_add_file,[ebuffer],[efileh]

Labels: , ,

Friday, 20 July 2012
disable MSYS bash beep bell sound
the beep is annoying especially you are inside library with lots of people.

follow this easy way to disable the beep sound.

locate your ~ directory in windows
in my case, since i install MinGW in D:/MinGW, my MSYS root is here
D:\MinGW\msys\1.0

open notepad / wordpad or other editor, type the following and save it as "inputrc", without the quotes and file extension
set bell-style none

the last step is using bash to rename the file to .inputrc
C:\WINDOWS>bash
bash-3.1$ cd ~
bash-3.1$ mv inputrc .inputrc

Labels: ,

Sunday, 15 July 2012
use MSYS cvs.exe to sync source code
one of the easiest method to sync sourceforge.net project code into your computer is using the MSYS cvs.exe application.

i created 3 .bat files for the purpose to sync im, cd and iup toolkit code into my computer for MAKE dllw4

im.bat
cvs -z3 -d:pserver:anonymous@imtoolkit.cvs.sourceforge.net:/cvsroot/imtoolkit co -P im

cd.bat
cvs -z3 -d:pserver:anonymous@canvasdraw.cvs.sourceforge.net:/cvsroot/canvasdraw co -P cd

iup.bat
cvs -z3 -d:pserver:anonymous@iup.cvs.sourceforge.net:/cvsroot/iup co -P iup

Labels: ,


Older Post

Home